Hey everyone..
I have been moderately decent about running lately. Not very good. Its difficult some days to find the time. But I have been putting in at least half an hour, 2-3 times a week. I think that is good enough for now. When the going is tough, there is no need to be too hard on oneself. I am happy if I just keep up the routine for now. Running easy, not hard; I just aim to finish the time or mileage goal for the day.
Hope you all are doing fine with your goals too. Good luck and see you around!

Monday, March 29, 2010
Friday, March 26, 2010
Vegetable Upma

Fig.1 Vegetable Upma
Today's post is for the Tried and Tasted event held at Dil Se this month, which features Raaga - The Singing Chef! I had never visited Raaga before (I am fairly new around here). I saw this event and her blog mentioned on other blogs. So I went and checked her out. She has tons of recipes. Lots of vegetables. Good find for future reference. From her posts, you feel Raaga is someone you might easily know, amongst your friends or class-mates or work-mates. If you explore her other blog you will see a lot of cool pics she takes around Delhi, etc. I also liked the fact that quite a few of Raaga's recipes resonate my sentiments for the quick, time-crunched style of food I often have to make.
Do I love to cook? Or am I cooking because I just have to? I think it's a combination of both.. there are times when I love to put together something awesome, don't mind the effort at all.. and other days when I am just so exhausted and tired of having to do everything on this planet!!
One such hectic day, I got home in time for a late lunch. I didn't want to cook. But I was hungry. My brain hurt and so did my body. So I did what everyone does in these situations.. I procrastinated! I surfed the internet.. the friend of all procrastinators.. hoping the food thoughts would just go away.. instead I found myself prowling on Raaga's food-blog. I casually browsed through her posts, looked at pictures of food, read her funny weeknight-stories about how she quickly whipped up something delicious! :) In no time I was in a better mood ... Look at this woman, I thought, she's cooking on weeknights! Yes, it's tough, but she's getting on with it! :) Inspired! Surely.. there must be something quick I can make for myself too! That's when I zeroed in on this quick and easy Vegetable Upma from her blog. At such times, we just let the vibes from Singing Chefs draw us to the kitchen and whip up an Upma. Go crazy and have breakfast at lunchtime! ;)
I loosely followed Raaga's recipe with whatever ingredients I had in my pantry and refrigerator. The Upma looked so good and I was so ravenous that I remembered to take a picture only after I had already scarfed down some! ;)
Here's what went into it:
Ingredients:
Rava (semolina) - 1 cup
Water ~ 2-3 cups
Mixed vegetables (chopped, frozen bag, contained onions, red and green peppers, carrots, peas, corn, lima beans, etc) - 1&1/2 cups
Udad Dal - 1/2 teaspoon
Chana Dal - 1/2 teaspoon
Mustard seeds - 1/4 teaspoon
Heeng (Asafoetida) - pinch
Kadi patta (Curry leaves) ~ 6
Ginger paste - 1 tablespoon (I like lots of ginger)
Red chilly powder -1 teaspoon, or to taste
Oil ~ 1 tablespoon
Salt to taste
Procedure:
1) Dry roast rava (or, put it in a bowl in a microwave and heat for about 3-4 minutes).
2) Heat oil, season the udad and chana dals, mustard, heeng, kadi patta and then ginger (in that order).
3) Add frozen (semi-thawed) chopped vegetables in the pan. Saute till they are cooked. Add salt and red chilly powder. Mix well.
4) Add roasted rava, saute a bit. Now add water. Water measurement may vary depending on how high your heat is. Add reasonable amount so that rava can absorb it. Add salt, cover and cook.
That's that!! Vegetable Upma is ready and we have triumphed over another day! :)
Saturday, March 20, 2010
Bengali Rasgulla
Hey everyone! Today's post is is my entry to Nupur's One Hot Stove event Blog Bites: Cookers. I don't have a rice cooker or slow cooker. So I am going to tell you about something I make in my basic pressure cooker - Rasgullas.

I never thought of Rasgullas as something to be made at home, least of all by me! They just sounded too exotic. It probably cannot be done, I thought. But once I made them, I was so glad I tried. I had been unnecessarily worrying about nothing!
However, instead of boast-blogging about "I made Rasgullas, it's all in the genes!!!" this Blog Bites event gives me the perfect opportunity to tell you all that the credit to making these goes entirely to Manjula of Manjula's Kitchen/ Bengali Rasgulla. She has videos on her website and youtube. And I used to watch those for time-pass... you know, just to watch something in the background while cooking-cleaning, when you don't have cable. I would never have actually considered making these if Manjula were not so sweet and encouraging in her video. She says at the end of the video, "..so how you can go wrong? You can never go wrong making the rasgullas!" :) By that she doesn't mean that it is an easy thing to make, but that one should buck up and try to do things that appear hard. It's possible that we were just worrying about nothing! And if indeed it turns out to be as tricky as it appeared, then we go about learning damage control with her help! ;) Never say never again!!!
The following is almost entirely her recipe. I have, however, made this a few times by now, so here I include just a few changes to adapt to my pressure cooker (which is smaller than hers and has a whistle). I must say that 4 out of 5 times I have made these they turned out perfect. (Once they turned out all squashy flat since I cooked them for too long, not knowing the correct whistle/cooking time-estimate. The gullas lost their patience in the cooker that time.)
Just fyi, I don't know what is the difference between Rasgulla and Bengali Rasgulla, which is what these are called on Manjula's blog. So if anyone knows, please enlighten me!
Ingredients:
2% milk - 4 cups
Lemon juice - 1/4 cup
Water to dilute lemon juice - 1/4 cup
Sugar - 1&1/2 cup
Water for sugar syrup - 4&1/2 cups
Procedure:
I - Making Paneer balls:
1) Boil 4 cups of milk. Add diluted lemon juice to it when boiling. Separate the paneer from the liquid by draining it using a cheese-cloth in a colander. Important - you need to wash the paneer at this point to ensure that no flavour of lemon remains in it.
2) Now this paneer is tied up tight in a cheesecloth and squeezed dry. Then this bundle is left under a heavy weight for about 1 hour to ensure that the paneer is dried well enough.
3) You will know if the amount of dryness is correct (say check after 1 hour) if you take a small marble-sized piece of the paneer in your hand and knead it with your fingers. After kneading for about 30 seconds, if the piece rolls into a nice smooth ball, then the paneer is ready. If your fingers feel wet then there is still water that needs to be drained. If the paneer is too crumbly, develops cracks in the ball, then you need to add a few drops of water. If you need more info, I have mentioned (in excrooociating detail) the method for making paneer in one of my previous posts.
4) If the paneer consistency is right, then proceed to take the entire lump of paneer on a separate plate or flat surface. Now knead the paneer very well, like dough, smearing the paneer flat over the plate and re-lumping/re-rolling it as you knead.
5) Now roll 16 small balls from this paneer. (Manjula rolls 12. My cooker has a smaller diameter than hers and the balls float on top. I make 16 smaller ones so that they don't stick to each other.)

II - Cooking them in the pressure cooker:
1) Now heat sugar water in a pressure cooker (with the coil on somewhat high, to speed up). Make sure the sugar is completely dissolved.
2) Turn the coil heat to medium. Put rolled balls into lightly steaming hot sugar-water in the pressure cooker. Not quite boiling. Add about half a glass more of unheated water at this point (just so its not at boiling point) and close the lid of the cooker. No whistle put on at this time.

3) Here I record what happened this time for me. Every time is slightly different. ;) After steam started coming out of the cooker (took about 8-10 mins after putting on the lid), I put on the whistle. The 1st whistle went off after 9-10 mins. I turned off the heat. Left it on the hot coil till it cooled down. Usually I just wait for the steam to cool off on its own. (But for the record, this time I waited for about 15 minutes and then made the steam go out myself. I wouldn't recommend this at all for safety reasons!)
4) Rasgullas should be cooked at this point. Open the lid when cool and place rasgullas with some of the sugar syrup in a bowl to refrigerate for a few hours. Serve chilled.

Verdict: Heaven!!!!!!!!!!!!!!!!!

Fig. 1. Bengali Rasgulla
I never thought of Rasgullas as something to be made at home, least of all by me! They just sounded too exotic. It probably cannot be done, I thought. But once I made them, I was so glad I tried. I had been unnecessarily worrying about nothing!
However, instead of boast-blogging about "I made Rasgullas, it's all in the genes!!!" this Blog Bites event gives me the perfect opportunity to tell you all that the credit to making these goes entirely to Manjula of Manjula's Kitchen/ Bengali Rasgulla. She has videos on her website and youtube. And I used to watch those for time-pass... you know, just to watch something in the background while cooking-cleaning, when you don't have cable. I would never have actually considered making these if Manjula were not so sweet and encouraging in her video. She says at the end of the video, "..so how you can go wrong? You can never go wrong making the rasgullas!" :) By that she doesn't mean that it is an easy thing to make, but that one should buck up and try to do things that appear hard. It's possible that we were just worrying about nothing! And if indeed it turns out to be as tricky as it appeared, then we go about learning damage control with her help! ;) Never say never again!!!
The following is almost entirely her recipe. I have, however, made this a few times by now, so here I include just a few changes to adapt to my pressure cooker (which is smaller than hers and has a whistle). I must say that 4 out of 5 times I have made these they turned out perfect. (Once they turned out all squashy flat since I cooked them for too long, not knowing the correct whistle/cooking time-estimate. The gullas lost their patience in the cooker that time.)
Just fyi, I don't know what is the difference between Rasgulla and Bengali Rasgulla, which is what these are called on Manjula's blog. So if anyone knows, please enlighten me!
Ingredients:
2% milk - 4 cups
Lemon juice - 1/4 cup
Water to dilute lemon juice - 1/4 cup
Sugar - 1&1/2 cup
Water for sugar syrup - 4&1/2 cups
Procedure:
I - Making Paneer balls:
1) Boil 4 cups of milk. Add diluted lemon juice to it when boiling. Separate the paneer from the liquid by draining it using a cheese-cloth in a colander. Important - you need to wash the paneer at this point to ensure that no flavour of lemon remains in it.
2) Now this paneer is tied up tight in a cheesecloth and squeezed dry. Then this bundle is left under a heavy weight for about 1 hour to ensure that the paneer is dried well enough.
3) You will know if the amount of dryness is correct (say check after 1 hour) if you take a small marble-sized piece of the paneer in your hand and knead it with your fingers. After kneading for about 30 seconds, if the piece rolls into a nice smooth ball, then the paneer is ready. If your fingers feel wet then there is still water that needs to be drained. If the paneer is too crumbly, develops cracks in the ball, then you need to add a few drops of water. If you need more info, I have mentioned (in excrooociating detail) the method for making paneer in one of my previous posts.
4) If the paneer consistency is right, then proceed to take the entire lump of paneer on a separate plate or flat surface. Now knead the paneer very well, like dough, smearing the paneer flat over the plate and re-lumping/re-rolling it as you knead.
5) Now roll 16 small balls from this paneer. (Manjula rolls 12. My cooker has a smaller diameter than hers and the balls float on top. I make 16 smaller ones so that they don't stick to each other.)

Fig. 2. Well-kneaded paneer balls show very few cracks
II - Cooking them in the pressure cooker:
1) Now heat sugar water in a pressure cooker (with the coil on somewhat high, to speed up). Make sure the sugar is completely dissolved.
2) Turn the coil heat to medium. Put rolled balls into lightly steaming hot sugar-water in the pressure cooker. Not quite boiling. Add about half a glass more of unheated water at this point (just so its not at boiling point) and close the lid of the cooker. No whistle put on at this time.

Fig. 3. Paneer balls are put with sugar water to cook in the pressure cooker
3) Here I record what happened this time for me. Every time is slightly different. ;) After steam started coming out of the cooker (took about 8-10 mins after putting on the lid), I put on the whistle. The 1st whistle went off after 9-10 mins. I turned off the heat. Left it on the hot coil till it cooled down. Usually I just wait for the steam to cool off on its own. (But for the record, this time I waited for about 15 minutes and then made the steam go out myself. I wouldn't recommend this at all for safety reasons!)
4) Rasgullas should be cooked at this point. Open the lid when cool and place rasgullas with some of the sugar syrup in a bowl to refrigerate for a few hours. Serve chilled.

Fig. 4. Rasgulla paradise awaits!
Verdict: Heaven!!!!!!!!!!!!!!!!!
Thursday, March 18, 2010
Spring is in the air!!!!!!
...... and how fragrant!!!

If anyone knows which flowers these are, I would love to know ..!
Wednesday, March 17, 2010
Paneer
I am making paneer today. I will refer to this post later on when I use paneer in spicy or sweet dishes. One new thing I am trying here is using viva brand towels to drain the paneer. Other than that this is just a normal paneer making recipe, so you can feel free to use cheese-cloth instead of these towels.

I really hate using re-used cheese-cloth to squeeze and drain water from paneer. It's not just the chore of washing it, which is quite alright if I wash one piece of cloth by hand. Its more that, after it is dried and I need to use it again, I worry.. how clean did I wash it? I don't like the questionable hygiene of re-used cloth touching food.
I have been using cheese-cloth all these years, it certainly works out well. And I did not know of any other option. I had heard about some sort of plastic paneer-maker thing, but as far as my friends have tried, it doesn't work out well. Recently I saw several advertisements for viva towels being used to make chakka (drain yogurt water), etc. So I wondered if I could give that a shot just once for paneer. It's disposable, presumably cleaner than cloth I have washed by hand. But will tiny pieces/shreds of towel paper get into my paneer? Will the paper towel tear up?
So today I show results from my experiment of using viva towels instead of cheese-cloth to drain paneer. From the picture above you can see that one way or another I did get paneer at the end. ;)
Clarification:
Here I am making paneer for Rasgullas. So the measures for milk and lemon juice and "sitting under weight time" are according to that recipe.
Ingredients:
2% reduced fat milk - 4 cups
Lemon juice - 1/4 cup
Water - roughly 1/4 cup
Procedure:
1) Mix lemon juice and water to dilute the lemon juice. (This I do especially because it lets me use minimum lemon juice while making in the paneer, which is important if you intend to use the paneer for sweet dishes like rasgulla, sandesh, rasmalai, etc.)
2) Now keep milk to boil.

3) When milk is bubbling, turn off the heat and add the diluted lemon juice. Add gradually. You might not need the entire 1/4 cup of lemon juice. (I didn't, but I'm afraid I cannot estimate how much I might have used on account of it being diluted.)
4) Stop when paneer floats to the top. Liquid below should be translucent. Now its time to drain out the liquid from this paneer.

5) I doubled two towels, wet them, squeezed out the water. The viva towels held fairly strong when I did that. Then I put them in a steel colander over a vessel (I like to collect the paneer liquid - is it called whey?)
6) Pour the paneer with its liquid into the colander. Paneer sits in the towel in the colander. Liquid gets collected in the vessel underneath.

7) Now I took the colander with paneer and washed the paneer with plain water once or twice (like washing rice or dal.) This is so the lemon flavour rinses out of the paneer. Need to wash well. Otherwise desserts made with the paneer may smell of lemon. (The lemony-ness is usually ok if paneer is being used in savoury dishes.)
8) Now I bundled up the towel with the paneer. I lightly squeezed out the paneer portion first (leaving top empty part slightly loose, but not quite open so as to not allow paneer to fall out from there). Then I squeezed out the top empty portion of the towels. Repeated squeezing out the paneer liquid a few more times till I felt like I have given it my best. If you are too aggressive with this, the towels may tear. They are not ultra strong.
10) Now I left a heavy weight i.e. pressure cooker (my heaviest item) on top of the squeezed-paneer bundle for about 1 hour (for rasgullas). What did the paneer look like after the allotted 1 hour? Perfect consistency!! (For paneer pic, refer to picture called Fig.1.) No shreds of the towels have found their way into the paneer. And paneer is as dry as it needs to be. Just perfect! If you want to use paneer for some savoury dish, like palak paneer, then you can leave the weight on the paneer for a little longer, say 2 hours in all, to get the paneer to be a little more dry/hard.
Verdict:
Is the viva towels experiment recommended? Umm.. let's see what we have..
Are there shreds of paper in the paneer? No. :)
Do the towels tear? They could tear if one is not very careful. So ensuring the dryness of paneer is a little bit tricky and requires a small amount of judgement.
So yes, I will use the viva towels again.
Something to note for future, I should get towels without coloured drawings on them. Who knows what kind of colour they use.. how fast it may be.. could be going into the paneer from the towels! Was not obvious here.
Feel free to weigh your options. My duty was to tell the world about my experiment. Spread information. Job done!
Happy cooking everyone!!

Fig. 1 Paneer
I really hate using re-used cheese-cloth to squeeze and drain water from paneer. It's not just the chore of washing it, which is quite alright if I wash one piece of cloth by hand. Its more that, after it is dried and I need to use it again, I worry.. how clean did I wash it? I don't like the questionable hygiene of re-used cloth touching food.
I have been using cheese-cloth all these years, it certainly works out well. And I did not know of any other option. I had heard about some sort of plastic paneer-maker thing, but as far as my friends have tried, it doesn't work out well. Recently I saw several advertisements for viva towels being used to make chakka (drain yogurt water), etc. So I wondered if I could give that a shot just once for paneer. It's disposable, presumably cleaner than cloth I have washed by hand. But will tiny pieces/shreds of towel paper get into my paneer? Will the paper towel tear up?
So today I show results from my experiment of using viva towels instead of cheese-cloth to drain paneer. From the picture above you can see that one way or another I did get paneer at the end. ;)
Clarification:
Here I am making paneer for Rasgullas. So the measures for milk and lemon juice and "sitting under weight time" are according to that recipe.
Ingredients:
2% reduced fat milk - 4 cups
Lemon juice - 1/4 cup
Water - roughly 1/4 cup
Procedure:
1) Mix lemon juice and water to dilute the lemon juice. (This I do especially because it lets me use minimum lemon juice while making in the paneer, which is important if you intend to use the paneer for sweet dishes like rasgulla, sandesh, rasmalai, etc.)
2) Now keep milk to boil.

Fig.2 Milk being heated
3) When milk is bubbling, turn off the heat and add the diluted lemon juice. Add gradually. You might not need the entire 1/4 cup of lemon juice. (I didn't, but I'm afraid I cannot estimate how much I might have used on account of it being diluted.)
4) Stop when paneer floats to the top. Liquid below should be translucent. Now its time to drain out the liquid from this paneer.

Fig.3 Paneer floats to the top
5) I doubled two towels, wet them, squeezed out the water. The viva towels held fairly strong when I did that. Then I put them in a steel colander over a vessel (I like to collect the paneer liquid - is it called whey?)

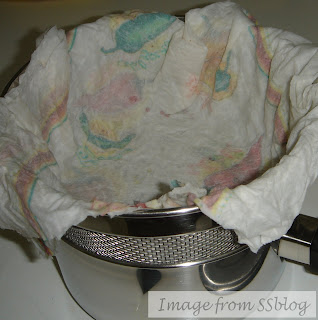
Fig. 4. Towels waiting to drain paneer
6) Pour the paneer with its liquid into the colander. Paneer sits in the towel in the colander. Liquid gets collected in the vessel underneath.

Fig. 5. Towels drain paneer
7) Now I took the colander with paneer and washed the paneer with plain water once or twice (like washing rice or dal.) This is so the lemon flavour rinses out of the paneer. Need to wash well. Otherwise desserts made with the paneer may smell of lemon. (The lemony-ness is usually ok if paneer is being used in savoury dishes.)
8) Now I bundled up the towel with the paneer. I lightly squeezed out the paneer portion first (leaving top empty part slightly loose, but not quite open so as to not allow paneer to fall out from there). Then I squeezed out the top empty portion of the towels. Repeated squeezing out the paneer liquid a few more times till I felt like I have given it my best. If you are too aggressive with this, the towels may tear. They are not ultra strong.
10) Now I left a heavy weight i.e. pressure cooker (my heaviest item) on top of the squeezed-paneer bundle for about 1 hour (for rasgullas). What did the paneer look like after the allotted 1 hour? Perfect consistency!! (For paneer pic, refer to picture called Fig.1.) No shreds of the towels have found their way into the paneer. And paneer is as dry as it needs to be. Just perfect! If you want to use paneer for some savoury dish, like palak paneer, then you can leave the weight on the paneer for a little longer, say 2 hours in all, to get the paneer to be a little more dry/hard.
Verdict:
Is the viva towels experiment recommended? Umm.. let's see what we have..
Are there shreds of paper in the paneer? No. :)
Do the towels tear? They could tear if one is not very careful. So ensuring the dryness of paneer is a little bit tricky and requires a small amount of judgement.
So yes, I will use the viva towels again.
Something to note for future, I should get towels without coloured drawings on them. Who knows what kind of colour they use.. how fast it may be.. could be going into the paneer from the towels! Was not obvious here.
Feel free to weigh your options. My duty was to tell the world about my experiment. Spread information. Job done!
Happy cooking everyone!!
Sunday, March 14, 2010
Aloo methi
Hey everyone..! Aloo methi with rotis today.

I love methi. No fresh methi here. Had some frozen methi chunks in my freezer that I needed to use up. Also wanted to make something that has heeng. My old heeng (ordinary store bought) was nothing compared to the heeng I was recently gifted by some family. Hmmm.. strong fragrance! I disagree with those who think heeng stinks. Ok, it's not great to smell.. but it's the distinct smell of seasoning! Seasoning isn't seasoning till heeng seasons the seasoning. (Goodness.. this is why people will soon be telling me not to blog!!) Anyway, this is my entry for Think Spice - Heeng, at Kharas Mithas which is part of the Think Spice event series started by Sunita Bhuyan.
Here's some info about Heeng on Wikipedia and about Methi on wikipedia. Do you like to read up about food? I do! I would like to read up about anything if given enough time. :)
Actually I'm sure there are more elaborate recipes out there which use heeng. But this is a start. This recipe is my Mom's. Don't know where she got it from. When I just started out cooking on my own, she had gifted me a nice diary where she had written up a pretty decent number of her recipes for me to take along with me. :) So this was one of the first recipes I tried on my own, written in her own hand. And I still always read it from the same book in her writing! :) Comes right every time!
Ingredients:
Potatoes, cooked, peeled and chopped ~ 2 medium
Methi (fenugreek leaves) ~ 3 frozen blocks (must be roughly 1 cup after defrosting)
Onion, finely chopped ~ 1 medium
Oil ~ 1 tablespoon
Rai (mustard seeeds) ~ 1/2 teaspoon
Jeera (cumin seeds) ~ 1/2 teaspoon
Heeng (asafoetida) ~ pinch
Haldi (turmeric) powder ~ 1/2 teaspoon
Green chillies ~ 1 or to taste
Salt to taste
Procedure:
1) Season rai, then jeera, then heeng in oil.
2) Add finely chopped onion. Saute till translucent. Add haldi.
3) Add methi and fry till slightly oily.
4) Add salt and chopped green chillies.
5) Add chopped, cooked potatoes and salt for potatoes.
6) Add very little water as per your preference (if you want slight moistness). Mix and cook.
Combination: I like to serve this with the simplest possible dal and rice or rotis.The flavour of methi gets overpowered by stronger accompaniments.

Fig. 1. Aloo methi
I love methi. No fresh methi here. Had some frozen methi chunks in my freezer that I needed to use up. Also wanted to make something that has heeng. My old heeng (ordinary store bought) was nothing compared to the heeng I was recently gifted by some family. Hmmm.. strong fragrance! I disagree with those who think heeng stinks. Ok, it's not great to smell.. but it's the distinct smell of seasoning! Seasoning isn't seasoning till heeng seasons the seasoning. (Goodness.. this is why people will soon be telling me not to blog!!) Anyway, this is my entry for Think Spice - Heeng, at Kharas Mithas which is part of the Think Spice event series started by Sunita Bhuyan.
Here's some info about Heeng on Wikipedia and about Methi on wikipedia. Do you like to read up about food? I do! I would like to read up about anything if given enough time. :)
Actually I'm sure there are more elaborate recipes out there which use heeng. But this is a start. This recipe is my Mom's. Don't know where she got it from. When I just started out cooking on my own, she had gifted me a nice diary where she had written up a pretty decent number of her recipes for me to take along with me. :) So this was one of the first recipes I tried on my own, written in her own hand. And I still always read it from the same book in her writing! :) Comes right every time!
Ingredients:
Potatoes, cooked, peeled and chopped ~ 2 medium
Methi (fenugreek leaves) ~ 3 frozen blocks (must be roughly 1 cup after defrosting)
Onion, finely chopped ~ 1 medium
Oil ~ 1 tablespoon
Rai (mustard seeeds) ~ 1/2 teaspoon
Jeera (cumin seeds) ~ 1/2 teaspoon
Heeng (asafoetida) ~ pinch
Haldi (turmeric) powder ~ 1/2 teaspoon
Green chillies ~ 1 or to taste
Salt to taste
Procedure:
1) Season rai, then jeera, then heeng in oil.
2) Add finely chopped onion. Saute till translucent. Add haldi.
3) Add methi and fry till slightly oily.
4) Add salt and chopped green chillies.
5) Add chopped, cooked potatoes and salt for potatoes.
6) Add very little water as per your preference (if you want slight moistness). Mix and cook.
Combination: I like to serve this with the simplest possible dal and rice or rotis.The flavour of methi gets overpowered by stronger accompaniments.
Saturday, March 13, 2010
Running today
I like to run.
I like to get out of the house and walk. Not stroll, walk.. walk walk.. walk faster.. then I get into a rhythm.. walking swiftly... and at one point, walking is no longer efficient.. then I run.. Its a slow run... very slow run... you can call it a jog.. a very slow jog.. The running world does not approve of the word "jog", its just called a run, no matter what the speed. :)
So I go slow.. as slow as I have to go. Am I gasping for breath? Then I go slower still. I don't care what people think. I don't care who looks at me. I don't care that others are running faster or longer. All I care is.. one foot goes in front of the other and I push on ahead... run run run..
I love to run! The wind rushes past my face.. the road sweeps behind me, as I put my feet forward one after another.. one more step, one more step. Deep breaths, deep breaths.. inhaling for 3 steps (right left right), exhaling through the next 3 steps (left right left), inhaling, exhaling.. I had never been so conscious of breath!! and its such a systematic rhythm!! in-in-in-out-out-out... 1-2-3, 1-2-3... in-in-in, out-out-out... 1-2-3, 1-2-3...and my mind is forced to sing.. "Kuch na... kaho..!! Kuch bhi na... kaho...!! 1-2-3, 1-2-3!! ...... " Shuddh desi runner!! ;)
PS: This post is for my sake.. so I remember tomorrow how fun it was to run yesterday. When the bed is warm and comfortable, its cold outside, even the sun is not quite ready to be up, and my alarm goes off telling me to get up and run, I often forget how running is so great!! Many such run-skipped mornings later, I have entirely forgotten the joy of running, I have forgotten that I can run, that it was the very effort that brought me joy! This post is for those days, to remind me that I really do love running!! And I certainly can run! So just go out there!! Run if I can, walk if I have to, crawl if I must, but I will not give it up!!!
Wednesday, March 10, 2010
Chawli/Lobia/Black-eyed pea cutlets and sandwich
Hi everyone! Second post...

Presently my criterion for "recipe to blog about" is really just "if I make it, I post it." So I am going to go with whatever I cook on a daily basis for now rather than wait around to cook fancy stuff. Daily food is of great value.. I mean, if I have to make it daily, it must be valuable! :)
I often don't have time to cook. But I am not very fond of eating out a lot. And I like to keep Maggie or take-out as reserve for really really hard days. So I often freeze and reserve some small quantities of home-made food for such moderately time-crunched-weeks. One of my plan-ahead foods is cutlets/burger patties.
Chawli/Lobia/ Black eyed pea cutlets:
I wanted to make cutlets that I can freeze. Non-vegetarian cutlets can be frozen quite easily. But vegetable cutlets often contain potatoes. Potatoes are good for binding the vegetables in the cutlet together. But I have not yet had a good experience with freezing cooked potatoes. After defrosting it, cooked potato feels crumbly/brittle/powdery as far as I have seen. :( So I have been wary of making potato based cutlets that are meant to be frozen.
However one binding thing that has worked well for me in frozen cutlets is bread crumbs. Bread crumbs absorb the moisture from veggies and become sort of pasty consistency that helps bind together the cutlet. So this recipe contains bread crumbs. No potatoes. I hear egg or corn flour paste work as well (for future reference, could try this recipe from Tasty Palettes/Mixed Sprouts Burger). For now there is no egg or corn flour paste in this recipe.
Here is some info about Lobia on wikipedia. Fairly healthy vegetarian way to get protein in our diet.
Oh, an addendum: I just read about the Mirch Masala: Announcement : My Legume Love Affair (MLLA) Edition 21 This appears to be the brainchild of The Well-Seasoned Cook. (Such nice names you all have!!) Since I just posted this recipe and looks like they are collecting legume based recipes I will send this post to their event!! How cool! My first event entry! :)
Ingredients: My quantities here are somewhat approximate. Please use your judgment while putting these together. Maybe I will update these in future if I find people actually using these measures!
Cooked, roughly mashed black eyed peas (lobia) ~ 1&1/2 cups after cooking
Cooked and roughly chopped spinach ~ 1/2 cup
Finely chopped cilantro ~ 4-5 stalks
Finely chopped green chillies ~ 1 or 2
Cumin seed (Jeera) powder ~ 1/2 teaspoon
Cilantro seed (dhania) powder ~ 1 teaspoon
Garam masala ~ 1/2 teaspoon for fragrance (optional).
Salt, pepper - to taste
Bread slices ~ 2-3 for bread crumbs (or can use store bought bread crumbs)
Semolina (Rava) ~ say about 1/4 cup to roll patty before frying.
Procedure:
1) Cook the black eyed peas (lobia) in a pressure cooker or in a vessel. I use pressure cooker when crunched for time. But avoid it if I have time. (Pain to wash large cooker!!) It will take time if you use an open pan. Can soak dry lobia in warm water for an hour or so and then cook on low.
2) Mash the cooked lobia roughly by hand (after it cools down) or with a potato masher.
3) Toast 2-3 slices of bread. Multigrain bread works good too. Run through a dry chopper to get bread crumbs. I hear untoasted bread works well for this too.
4) Meanwhile cook the spinach (say in a microwave for about 2-3 minutes) and then roughly chop the cooked spinach. Instead of spinach you can use whatever veggies are at hand. For firm, solid veggies like zucchini or carrots chop them somewhat finely after cooking.
5) Mix in a bowl - chopped cooked vegetables (spinach in this case), finely chopped cilantro and green chillies, mashed lobia, salt, pepper, garam masala, cumin seed (jeera) powder, cilantro seed (dhania) powder. Mix these well with your hand. Let the spices and salt get well homogenized with the lobia and veggies.
6) Then add bread crumbs and lightly kneed-in with hand. Add a little water to the mixture if you feel it is too dry. After bread crumbs have been added you should be able to press together and shape handfuls of the mixture into small patties. If the mixture is too dry and crumbly you may need to add more water. If that still doesn't help hold the mixture together maybe add more bread crumbs and water.
7) Shape into flat round patties. I got about 8 medium patties.
8) Now, you can shallow-fry the patties as they are. I like to dip them in some semolina (rava) to give the patty some crispness.
Tip:
1) I shallow-fried about 4 of these cutlets immediately. I froze the remaining 4 patties (after rolling in rava, but still unfried) in a ziplock bag. Stayed just fine in the freezer. To defrost, I take say 2 cutlets out the previous night and keep them in the fridge section. In the morning they are defrosted enough to be shallow-fried.
2) I would not have believed it till I did it myself, but you don't need much oil if you use a good non-stick pan. I think mine is called "hard-anodized" and I love it. I used about 1-2 drops of oil per side for each cutlet. If I had that "brush thing" I think it would have been enough to lightly "brush" a bit of oil on each side of the cutlet.
Sandwich:
I like to use these cutlets in a sandwich, say for lunch. Here is a simple sandwich lunch I made today.. bread, butter, green chutney, tomato slices, salt + red chilly flakes, 2 cutlets per sandwich. All packed in cling wrap. Do serve ketchup on the side - these cutlets are a bit on the dry side otherwise.

I like to combine this with other accompaniments for a lunch-box. I usually go for yogurt and fruits. Here I have also added tomato ketchup in a make-shift foil "sachet". This way I feel there is enough to eat if you are really hungry. If not, you can just save yogurt or fruit for later.

If you like them, orange juice/coke, crackers, chips, bottled cold-coffee, bottled flavored milk, etc. make decent add-ons too. Depends on how health conscious you feel that morning. ;) If you don't pack junk you can't eat junk? Doesn't always work that way.. the vending machine is thy enemy!
Ok, folks! Thanks for reading and please visit again! I hope to post every so often... once a week average is the goal. I know, my blog could do with a nicer name.. but imagination does not spark at the moment. Ok, I'll get going now. Happy cooking!

Fig 1. Lobia/ Black eyed pea cutlets
Presently my criterion for "recipe to blog about" is really just "if I make it, I post it." So I am going to go with whatever I cook on a daily basis for now rather than wait around to cook fancy stuff. Daily food is of great value.. I mean, if I have to make it daily, it must be valuable! :)
I often don't have time to cook. But I am not very fond of eating out a lot. And I like to keep Maggie or take-out as reserve for really really hard days. So I often freeze and reserve some small quantities of home-made food for such moderately time-crunched-weeks. One of my plan-ahead foods is cutlets/burger patties.
Chawli/Lobia/ Black eyed pea cutlets:
I wanted to make cutlets that I can freeze. Non-vegetarian cutlets can be frozen quite easily. But vegetable cutlets often contain potatoes. Potatoes are good for binding the vegetables in the cutlet together. But I have not yet had a good experience with freezing cooked potatoes. After defrosting it, cooked potato feels crumbly/brittle/powdery as far as I have seen. :( So I have been wary of making potato based cutlets that are meant to be frozen.
However one binding thing that has worked well for me in frozen cutlets is bread crumbs. Bread crumbs absorb the moisture from veggies and become sort of pasty consistency that helps bind together the cutlet. So this recipe contains bread crumbs. No potatoes. I hear egg or corn flour paste work as well (for future reference, could try this recipe from Tasty Palettes/Mixed Sprouts Burger). For now there is no egg or corn flour paste in this recipe.
Here is some info about Lobia on wikipedia. Fairly healthy vegetarian way to get protein in our diet.
Oh, an addendum: I just read about the Mirch Masala: Announcement : My Legume Love Affair (MLLA) Edition 21 This appears to be the brainchild of The Well-Seasoned Cook. (Such nice names you all have!!) Since I just posted this recipe and looks like they are collecting legume based recipes I will send this post to their event!! How cool! My first event entry! :)
Ingredients: My quantities here are somewhat approximate. Please use your judgment while putting these together. Maybe I will update these in future if I find people actually using these measures!
Cooked, roughly mashed black eyed peas (lobia) ~ 1&1/2 cups after cooking
Cooked and roughly chopped spinach ~ 1/2 cup
Finely chopped cilantro ~ 4-5 stalks
Finely chopped green chillies ~ 1 or 2
Cumin seed (Jeera) powder ~ 1/2 teaspoon
Cilantro seed (dhania) powder ~ 1 teaspoon
Garam masala ~ 1/2 teaspoon for fragrance (optional).
Salt, pepper - to taste
Bread slices ~ 2-3 for bread crumbs (or can use store bought bread crumbs)
Semolina (Rava) ~ say about 1/4 cup to roll patty before frying.
Procedure:
1) Cook the black eyed peas (lobia) in a pressure cooker or in a vessel. I use pressure cooker when crunched for time. But avoid it if I have time. (Pain to wash large cooker!!) It will take time if you use an open pan. Can soak dry lobia in warm water for an hour or so and then cook on low.
2) Mash the cooked lobia roughly by hand (after it cools down) or with a potato masher.
3) Toast 2-3 slices of bread. Multigrain bread works good too. Run through a dry chopper to get bread crumbs. I hear untoasted bread works well for this too.
4) Meanwhile cook the spinach (say in a microwave for about 2-3 minutes) and then roughly chop the cooked spinach. Instead of spinach you can use whatever veggies are at hand. For firm, solid veggies like zucchini or carrots chop them somewhat finely after cooking.
5) Mix in a bowl - chopped cooked vegetables (spinach in this case), finely chopped cilantro and green chillies, mashed lobia, salt, pepper, garam masala, cumin seed (jeera) powder, cilantro seed (dhania) powder. Mix these well with your hand. Let the spices and salt get well homogenized with the lobia and veggies.
6) Then add bread crumbs and lightly kneed-in with hand. Add a little water to the mixture if you feel it is too dry. After bread crumbs have been added you should be able to press together and shape handfuls of the mixture into small patties. If the mixture is too dry and crumbly you may need to add more water. If that still doesn't help hold the mixture together maybe add more bread crumbs and water.
7) Shape into flat round patties. I got about 8 medium patties.
8) Now, you can shallow-fry the patties as they are. I like to dip them in some semolina (rava) to give the patty some crispness.
Tip:
1) I shallow-fried about 4 of these cutlets immediately. I froze the remaining 4 patties (after rolling in rava, but still unfried) in a ziplock bag. Stayed just fine in the freezer. To defrost, I take say 2 cutlets out the previous night and keep them in the fridge section. In the morning they are defrosted enough to be shallow-fried.
2) I would not have believed it till I did it myself, but you don't need much oil if you use a good non-stick pan. I think mine is called "hard-anodized" and I love it. I used about 1-2 drops of oil per side for each cutlet. If I had that "brush thing" I think it would have been enough to lightly "brush" a bit of oil on each side of the cutlet.
Sandwich:
I like to use these cutlets in a sandwich, say for lunch. Here is a simple sandwich lunch I made today.. bread, butter, green chutney, tomato slices, salt + red chilly flakes, 2 cutlets per sandwich. All packed in cling wrap. Do serve ketchup on the side - these cutlets are a bit on the dry side otherwise.

Fig. 2. Cutlet sandwich
I like to combine this with other accompaniments for a lunch-box. I usually go for yogurt and fruits. Here I have also added tomato ketchup in a make-shift foil "sachet". This way I feel there is enough to eat if you are really hungry. If not, you can just save yogurt or fruit for later.

Fig. 3. Today's lunch combo - (top, clockwise) Yogurt, fruit, cutlet sandwich and a sachet of ketchup
If you like them, orange juice/coke, crackers, chips, bottled cold-coffee, bottled flavored milk, etc. make decent add-ons too. Depends on how health conscious you feel that morning. ;) If you don't pack junk you can't eat junk? Doesn't always work that way.. the vending machine is thy enemy!
Ok, folks! Thanks for reading and please visit again! I hope to post every so often... once a week average is the goal. I know, my blog could do with a nicer name.. but imagination does not spark at the moment. Ok, I'll get going now. Happy cooking!
Monday, March 8, 2010
Mom's fresh garlic chutney
Hi everyone, this is my very first post. I am hoping to start off this blog as a place where I write about things that I like and do in my spare time.. probably food, birds, nature, learning and travel. Here's to a good beginning!
I have been reading and using recipes from food blogs for a while now. I am a so-so cook, not particularly spectacular. So this is not an expert's "how to make.." blog. I just want to archive some of this food I am making. Maybe sometime in future I will look at these recipes and pictures and hopefully be inspired to cook more. Some of these recipes are my Mom's or Grandma's, some are from other members of the family or friends, some are from other blogs. I give thanks to them in advance! :)
The recipe I post today, my very first blog recipe, is my Mom's fresh garlic chutney.

Ingredients: (quantities here are rough measures, taste and see if you need more or less.)
Fresh grated coconut - about 1 cup
Fried red chillies (I used red chilly powder) - about 1 teaspoon or to taste
Tamarind (I used Tamarind paste) - about 3/4 teaspoon
Garlic (peeled) - about 3-4 medium pods
Salt - to taste
Water - as needed
Procedure:
Grind fresh grated coconut + red chilly powder + peeled garlic pods.Add water as little as needed to grind. Add slightly diluted tamarind paste and salt and mix/grind once more to make sure it's all well homogenized. That's all! Its the yummiest accompaniment to dosa, idli or bhakri. For accompaniment with bhakris, add finely chopped onions to chutney.
Tip:
I make this chutney in bulk on weekends. I pour it in an ice cube tray and seal it with Press-n-Seal plastic wrap so that the freezer doesn't smell of garlic. The frozen cubes of chutney can be kept in a ziplock bag later. Then later in the week or month, when I make dosa or idli and don't have time to make chutney or fall short on sambar or other accompaniments, I take out 2 cubes of chutney per person and defrost just that much. Saves me time.

By the way, this tip about freezing chutney is something I have heard others do and have also read generally in other blogs. Here is where I heard about making it into ice cubes: Manjula's Kitchen/Hari Chutney. Nice idea.
Well that's that. First post down. Happy cooking!
I have been reading and using recipes from food blogs for a while now. I am a so-so cook, not particularly spectacular. So this is not an expert's "how to make.." blog. I just want to archive some of this food I am making. Maybe sometime in future I will look at these recipes and pictures and hopefully be inspired to cook more. Some of these recipes are my Mom's or Grandma's, some are from other members of the family or friends, some are from other blogs. I give thanks to them in advance! :)
The recipe I post today, my very first blog recipe, is my Mom's fresh garlic chutney.

Fig 1. Mom's fresh garlic chutney
Ingredients: (quantities here are rough measures, taste and see if you need more or less.)
Fresh grated coconut - about 1 cup
Fried red chillies (I used red chilly powder) - about 1 teaspoon or to taste
Tamarind (I used Tamarind paste) - about 3/4 teaspoon
Garlic (peeled) - about 3-4 medium pods
Salt - to taste
Water - as needed
Procedure:
Grind fresh grated coconut + red chilly powder + peeled garlic pods.Add water as little as needed to grind. Add slightly diluted tamarind paste and salt and mix/grind once more to make sure it's all well homogenized. That's all! Its the yummiest accompaniment to dosa, idli or bhakri. For accompaniment with bhakris, add finely chopped onions to chutney.
Tip:
I make this chutney in bulk on weekends. I pour it in an ice cube tray and seal it with Press-n-Seal plastic wrap so that the freezer doesn't smell of garlic. The frozen cubes of chutney can be kept in a ziplock bag later. Then later in the week or month, when I make dosa or idli and don't have time to make chutney or fall short on sambar or other accompaniments, I take out 2 cubes of chutney per person and defrost just that much. Saves me time.

Fig 2. After freezing chutney into cubes can store in ziplock bag.
By the way, this tip about freezing chutney is something I have heard others do and have also read generally in other blogs. Here is where I heard about making it into ice cubes: Manjula's Kitchen/Hari Chutney. Nice idea.
Well that's that. First post down. Happy cooking!
Subscribe to:
Posts (Atom)